![]() Installing Python isn’t hard. Figuring out what to install is a nightmare. This is my experience with installing Python and some Modules on Windows and it’s good news, I promise.
Installing Python isn’t hard. Figuring out what to install is a nightmare. This is my experience with installing Python and some Modules on Windows and it’s good news, I promise.
I’ve done some work with Python on Raspberry Pi Rasbian and on Ubuntu Linux, but I’ve steered well clear of Python on Windows for one simple (albeit embarrassing) reason: I couldn’t figure out how to add modules (also sometimes called packages). Installing Python is really straightforward thanks to the ladies and gentlemen over at the Python Software Foundation, but third-party modules are extremely daunting to the novice. Enter Python hero: Christoph Gohlke of the Laboratory of Fluorescence Dynamics at UCI. He has compiled versions of popular modules available for free on his UCI website.
Check out “The Short Version” if you only want the step-by-step.
The Long Version:
For those that are unfamiliar with Python, here’s a quick tutorial: Python is a programming language that has been designed to be cross-platform and human-readable. The modules I was referring to earlier are libraries of code, both written in C and python that provide extra functions to vanilla Python that it’s developers didn’t include. For example, Numpy is a popular module which provides mathematical operators like trigonometric, exponential, and logarithmic functions.
Python and the modules I’m talking about in this post are also licensed as open-source software meaning that anyone can download them and use them in their own software solutions, provided they abide by the conditions of the licenses. While Python as the language is governed and distributed by the Python Software Foundation, the modules aren’t and can be created by anyone. You could imagine that this might cause problems like “which modules can be trusted” and “how do I know it will work” and they do. I overcome these issues by either looking online for examples that do similar things to what I want to do, checking out module documentation, and finally, trying it out. It’s a time consuming process to vet a new module, but the price is right.
If you’ve tried to install Python and a module (I’m going to talk about Numpy, for example, but other modules are similar), then you probably found the right Python installer on Python.org, installed it without issue, then emboldened by your newly found powers, struck off for Numpy.org only to panic when the download option is for source code from GitHub and not an installer. I was there, friend, I feel your pain.
The expectation with supplying the source code is that you as the user would compile it yourself. They generally provide some instructions, but the general consensus is that their target audience are developers and compiling code is something developers know how to do. To be fair, there is such a variety of compilers that it’s almost impossible to give a universal set of instructions. Because Linux comes with open-source compilers for C and C++, it’s easy for Linux installations to be automated, but no such luck for Windows.
To make installation easier, Eggs (legacy) and Wheels (modern since 2012) were introduced as standardized formats for code and binaries (compiled code). They are essentially Python-specific installation files. Wheels seem great in theory, but at the end of the day, they contain pre-compiled code which means that anyone that uses them are subject to the details of the computer that compiled them. For example, if a developer like Mr. Gohlke wants to contribute to the community and make life easier for the rest of us by compiling the source code, then the wheel that he produces may or may not work for someone else because of the version of source he used, the compiler and any options he selected, the OS running on his computer, the processor architecture, and the versions of Python and PIP he had installed at the time. Generally speaking, this tends to be a non-issue as long as the broad strokes are same, but sometimes the differences between his computer and someone else’s may make the compiled code misbehave. The good news, here is that wheels are generally useful and they can be a lot easier than compiling your own source if your computer science skills are limited.
“Okay, now I know the history of the world, but what can I do with it?” you may ask…
The Short Version:
Based on my (limited) experience, I put together these steps which I’m sharing as a guide to help accelerate your python installation process. To be clear, I’m not guaranteeing that these steps will work and some interpretation may be required to get them to work.
My process involves changing the existing path variables which if done incorrectly can destabilize your computer, so use extreme caution! These steps are provided for information only. Your actual mileage may vary. If you aren’t comfortable with these steps, I’d suggest you find another way to install Python..
- Download and install Python from Python.org.
- Add python and pip to the path variable.
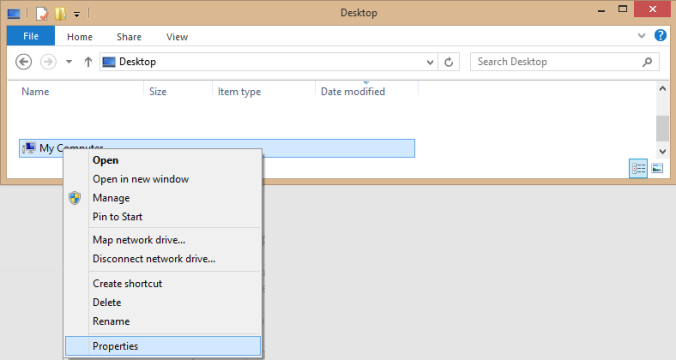
- Right click on “My Computer” in windows explorer, then click “Properties” in the menu.
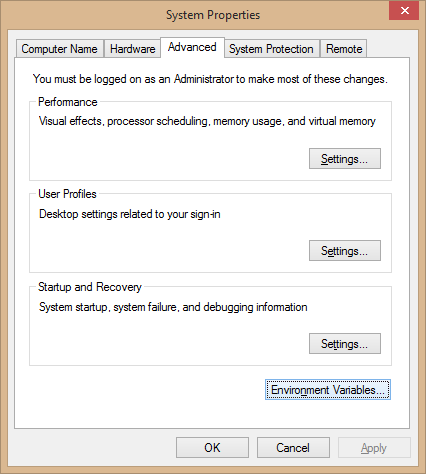
- Click “Advanced System Settings” in the System window (administrative credentials required)
- In the “System Properties” dialog, click the “Environment Variables…” button in the “Advanced” tab.
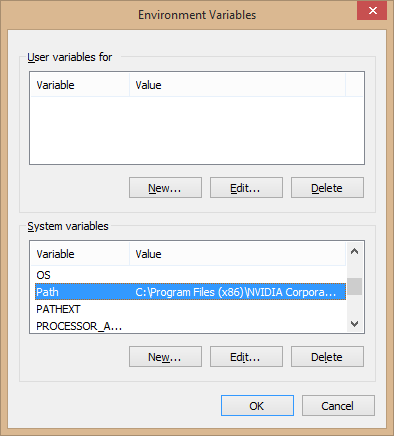
- Find “Path” in the System variables frame of the “Environment Variables” dialog and click “Edit…”
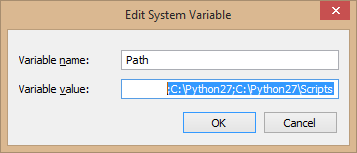
- Add the python and pip paths to your path variable
On my computer, Python installed to the default location, so the added text is (no quotes): “;C:\Python27;C:\Python27\Scripts”
- Click OK all the way back.
- Right click on “My Computer” in windows explorer, then click “Properties” in the menu.
- Download the pre-compiled pip files for the modules you want from Christoph Gohlke’s webpage.
- The version you download has to match your computer configuration. For example, I’m installing wheels for Python 2.7 and my computer is an AMD 64 machine, so for Numpy, I picked
numpy-1.11.1+mkl-cp27-cp27m-win_amd64.whl
- The version you download has to match your computer configuration. For example, I’m installing wheels for Python 2.7 and my computer is an AMD 64 machine, so for Numpy, I picked
- Install the wheel files using pip through an admin command prompt.
- When you go to launch the command prompt, right-click on it and select the “Run as administrator” option.
- use the “cd” command to navigate to the folder where you downloaded the wheel files
For example:
cd C:\Users\Guest\Downloads
navigates to the default downloads folder on my computer for username “Guest”. (Note the space between cd and C:\…) - invoke pip to install the wheel file by typing “pip install <wheel>” where <wheel> represents the filename for the wheel including the .whl extension.
- Test out the module by opening IDLE and typing “import <module>” where <module> represents the module name like “numpy” for Numpy and “cv2” for OpenCV. If something went wrong, python will return an error message.


I hope this little guide helps you understand Python a little better and helps you get up and running faster. Please share your experience by leaving a comment below.
If you liked this project, you might also like:
Did you like It’s Project Day? You can subscribe to email notifications by clicking ‘Follow’ in the side bar on the right, or leave a comment below.

Pingback: Baby + IFTTT + Google Assistant = Awesome! | It's Project Day!